How I made an interactive hero section with p5.js for my website

When I made the decision to go freelance, setting up my own website became a top priority but also a huge source of anxiety. I needed potential clients to take me seriously, understand my areas of expertise, have confidence in the standard of my work and get to know me all at the same time.
While I was in full-time employment, I never had the time nor the real need for a personal website, but always envied others who did - I started and then shelved about four over the years. Funnily enough, p5.js was one of my first real forays in to writing code; I would watch Daniel Shiffman's YouTube channel The Coding Train and follow along to the best of my ability. I became obsessed with the instant gratification of tweaking my code and seeing the resulting sketch on the screen change. During this period, I was working on my final year project in my degree, a paper analysing the retro game 'Lights Out!'. The game is played on a grid of lights, where toggling one of them on or off also toggles the state of the four or fewer orthogonally adjacent lights. I'd followed along with The Coding Train's tutorials making Minesweeper and Noughts and Crosses, also played on a grid, so figured coding up my own version of 'Lights Out!' would be a great exercise in my learning and help me gain a deeper understanding of the game for my uni project.
One two, skip a few and here we are today. I wanted my website to be lightweight, blazingly fast, buttery smooth but with plenty of interactivity. It needed to feel nice. I decided I wanted the hero section in particular to be something you'd play with absent-mindedly while on a boring meeting. p5.js is a fantastic library for creating interactive animated graphics on the web, so it was a logical place to begin while also being a satisfying callback to the start of my journey writing code over five years ago.
N.B. I'll be omitting anything superfluous to the overall effect from this article, like how I made the section mobile-friendly and move out of the way of the menu.
Starting the sketch
It's been a while since I played with p5 outside of the official p5 editor, so I refreshed my memory and got started with a basic sketch:
(Ok, I couldn't resist making it responsive)
This code is just over 100 lines but could definitely be more concise, at this stage you could say it's a little excessive having the HeroSketch and Cell classes implemented, but they make everything more organised as the complexity grows.
I'm using a 2D array to keep track of all my cells, where each element (sub-array) in the array represents a row, and each element within each row sub-array is a cell. HeroSketch is just handling resizing and initialisation, most of the fun stuff is going to happen inside Cell. For now, we just have a show() method which draws a circle at the centre of the cell with the given diameter, which are the moment we're just hard-coding in the constructor as this.sketch.CELL_W - 2, so the circles don't quite touch.
Mouse interactivity
P5 provides us with global variables mouseX and mouseY which track the cursor's position on the page. The goal for this effect is to have the diameter of each circle be proportional to the cursor's proximity to each cell. In other words, the closer the mouse is to a circle, the bigger we want it to be. We can add a method updateSize() to our Cell and call it in the p5.draw function, so we calculate the new size of each cell every frame:
// hero.ts
class Cell {
	// ...
	updateSize() {
		const distance = Math.sqrt(
			Math.pow(Math.abs(this.x - this.sketch.p5.mouseX), 2) +
				Math.pow(Math.abs(this.y - this.sketch.p5.mouseY), 2),
		);

		let scaleFactor = mapRanges({
			input: Math.min(distance, this.sketch.CELL_W * this.sketch.RESOLUTION_X),
			inputRange: [0, this.sketch.CELL_W * this.sketch.RESOLUTION_X],
			targetRange: [1, 0.001],
		});

		let newDiam = this.sketch.CELL_W * scaleFactor;

		this.d = Math.min(Math.max(Cell.MIN_SIZE, newDiam), this.sketch.CELL_W - 2);
	}
	// ...
}

// ...

const sketch = (p5: P5) => {
	// ...
	p5.draw = () => {
		// ...
		for (let i = 0; i < sketch.cells.length; i++) {
			for (let j = 0; j < sketch.cells[i].length; j++) {
				sketch.cells[i][j].updateSize(); // calculate new size of circle in Cell
				// ...
			}
		}
	};
};
Inside updateSize(), we get the distance between the cursor and the cell's position using the Pythagoream theorem, and we use mapRanges() to map this distance to a number between 1 and 0.001, because we want when the distance is 0 for the circle to have a scale factor of 1, and when distance is large for the circle to get smaller. I implemented mapRanges() using this stackoverflow thread. We then make sure the new diamater is within our min and max range of circle sizes - you can definitely be better with your calculations to avoid this.
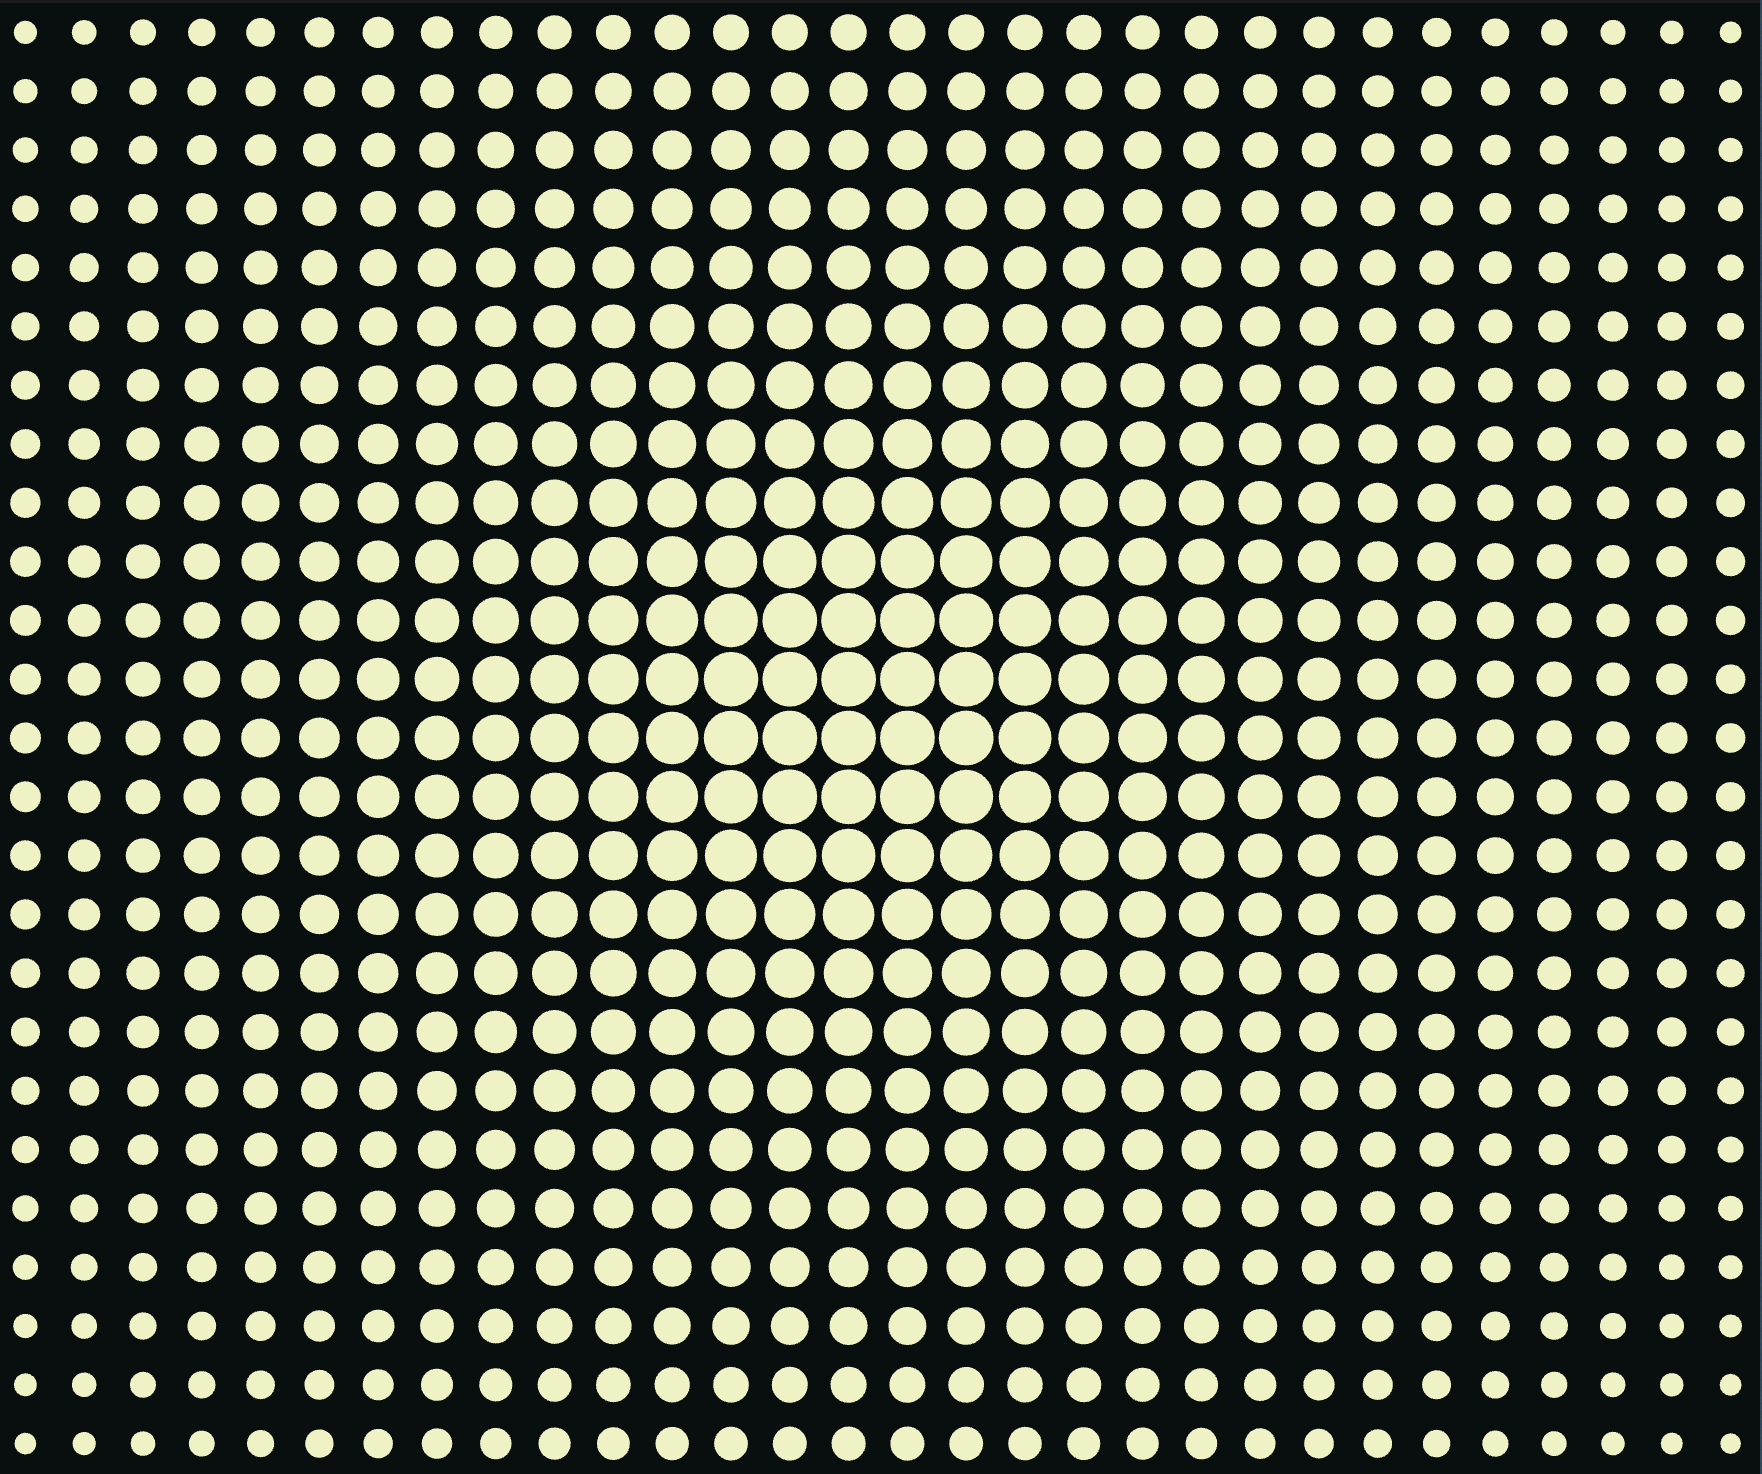
This code works, but the diameter of each circle decreases linearly, like so:
The effect would be much nicer if the diamater of each circle fell off more quickly as the distance from the cursor increases. We want to take our scale factor, some number between 0.001 and 1, and apply a function to it such that its value decreases rapidly as it gets further from 1. Playing around on Desmos is really useful here, and I landed on f(x) = 100e^b(x-c), where b = ln(0.001) / (0.001 - 1) and c = 0.001 - ln(0.00001) / b. LLMs are genuinely helpful here too as this is a really well-defined problem with a clear method if you wish to avoid blowing dust off your old calculus textbook.
After implementing this, we get the following:
Much better, right? My next gripe was that this felt far too fast. I wanted the circles to ebb and flow, leaving a slowly dissipating trail behind them as you move your mouse around the screen.
To achieve this, we need to keep track of the diamater before we update it, and clamp the increase in its value based on some min and max values. You could just use one ceiling, but I liked allowing the circles to grow faster than they could shrink. The additions are pretty minimal:
// hero.ts
class Cell {
	static MAX_SIZE_INCR_PER_FRAME = 0.5;
	static MAX_SIZE_DECR_PER_FRAME = 0.1;
	// ...

	updateSize() {
		const oldDiam = this.d; // keep track of current value

		const distance = Math.sqrt(
			Math.pow(Math.abs(this.x - this.sketch.p5.mouseX), 2) +
				Math.pow(Math.abs(this.y - this.sketch.p5.mouseY), 2),
		);

		let scaleFactor = mapRanges({
			input: Math.min(distance, this.sketch.CELL_W * this.sketch.RESOLUTION_X),
			inputRange: [0, this.sketch.CELL_W * this.sketch.RESOLUTION_X],
			targetRange: [1, 0.001],
		});

		// f(x) = a* e^(b(x - c));
		const a = 100;
		const b = Math.log(0.001) / (0.001 - 1);
		const c = 0.001 - Math.log(0.001 / a) / b;
		scaleFactor = a * Math.pow(Math.E, b * (scaleFactor - c));

		let newDiam = this.sketch.CELL_W * scaleFactor;

		/*
                clamp the difference between newDiam and oldDiam based on some constant,
                dependent on whether we are growing or shrinking.
                */
		if (newDiam > oldDiam && newDiam - oldDiam > Cell.MAX_SIZE_INCR_PER_FRAME) {
			newDiam = oldDiam + Cell.MAX_SIZE_INCR_PER_FRAME;
		} else if (newDiam < oldDiam && oldDiam - newDiam > Cell.MAX_SIZE_DECR_PER_FRAME) {
			newDiam = oldDiam - Cell.MAX_SIZE_DECR_PER_FRAME;
		}

		this.d = Math.min(Math.max(Cell.MIN_SIZE, newDiam), this.sketch.CELL_W - 2);
	}
}
But the result is miles better:
Changing the shape
Circles are cool, but what if you could control the shape of the cells with some sort of toggle on the screen? Triangles looked awful, so I settled on squares and crosses (my last name begins with a t, so maybe that's a nice reference?). You can check out the HTML and CSS in the next sandbox, but we'll focus on the JS/TS additions:
// shapecontrols.ts
const shapeControls = document.querySelector(".shape-controls");
const buttons = shapeControls.querySelectorAll("button");

const shapeChangeEvent = new Event("shapechange");

for (let i = 0; i < buttons.length; i++) {
	const button = buttons[i];

	button.addEventListener("click", (e) => {
		e.target.dispatchEvent(shapeChangeEvent);
		const siblings = (e.target as HTMLElement).parentElement.children;

		if (siblings) {
			Array.from(siblings).forEach((sibling) => sibling.classList.remove("active"));

			(e.target as HTMLElement).classList.add("active");
		}
	});
}
Pretty straightforward, listen for clicks on any of the buttons within .shape-controls, and fire the shapechange Event from the button. We need to fire it from the buttons themselves so that wherever we process these events, we can get the shape that was clicked (which I've just used the name HTML attribute to do). Here's the event handling code in our sketch:
// hero.ts
class HeroSketch {
	// ...
	MODE: "circle" | "rect" | "cross" = "circle";

	constructor(p5: P5) {
		// ...
		const shapeControls = document.querySelector(".shape-controls") as HTMLDivElement;
		const shapeControlButtons = shapeControls.children;

		for (let i = 0; i < shapeControlButtons.length; i++) {
			shapeControlButtons[i].addEventListener("shapechange", (e) => {
				this.MODE = (e.target as HTMLButtonElement).name as "circle" | "rect" | "cross";
			});
		}
	}
}

// ...

class Cell {
	// ...
	show() {
		const centre = {
			x: this.x + this.sketch.CELL_W / 2,
			y: this.y + this.sketch.CELL_W / 2,
		};

		switch (this.sketch.MODE) {
			case "circle":
				this.sketch.p5.circle(centre.x, centre.y, this.d);
				break;
			case "rect":
				this.sketch.p5.rect(centre.x, centre.y, this.d, this.d);
				break;
			case "cross":
				this.sketch.p5.beginShape(this.sketch.p5.TESS);
				this.sketch.p5.vertex(centre.x - this.d / 5, centre.y - this.d / 2, 0);
				this.sketch.p5.vertex(centre.x + this.d / 5, centre.y - this.d / 2, 0);
				this.sketch.p5.vertex(centre.x + this.d / 5, centre.y - this.d / 5, 0);
				this.sketch.p5.vertex(centre.x + this.d / 2, centre.y - this.d / 5, 0); // 4
				this.sketch.p5.vertex(centre.x + this.d / 2, centre.y + this.d / 5, 0);
				this.sketch.p5.vertex(centre.x + this.d / 5, centre.y + this.d / 5, 0);
				this.sketch.p5.vertex(centre.x + this.d / 5, centre.y + this.d / 2, 0);
				this.sketch.p5.vertex(centre.x - this.d / 5, centre.y + this.d / 2, 0); // 8
				this.sketch.p5.vertex(centre.x - this.d / 5, centre.y + this.d / 5, 0);
				this.sketch.p5.vertex(centre.x - this.d / 2, centre.y + this.d / 5, 0);
				this.sketch.p5.vertex(centre.x - this.d / 2, centre.y - this.d / 5, 0);
				this.sketch.p5.vertex(centre.x - this.d / 5, centre.y - this.d / 5, 0); // 12
				this.sketch.p5.endShape(this.sketch.p5.CLOSE);
				break;
		}
	}
}
So we store the current shape mode in HeroSketch, and inside our cell's show() method we draw the corresponding shape. Hand-coding each vertex of the cross shape was tricky but fun, I played around with the thickness of each 'arm' until I was happy with the result:
Click interactivity
Given that most users will be viewing the site on mobile, this really isn't important - but we're having fun at this point, so let's add another effect. I played with a few different ideas here, many of which kept the cells somehwat confined to their grid arrangement. I liked the idea of abandoning this, letting them move freely around the screen. I settled on allowing the user to 'draw' on the screen by pushing the shapes out of the path traced by their mouse while the mouse button is held down.
To achieve this, let's add another method to Cell. We have updateSize(), so let's write updatePosition(). This function should check if the mouse is currently being clicked, check the location of the mouse in relation to the cell, then calculate how much to move the cell and in which direction. When the mouse is released, cells should move back to their original locations.
First, we'll hook on to p5's mousePressed() and mouseReleased() built-ins, and store the state of the mouse in HeroSketch:
// hero.ts
class HeroSketch {
	// ...
	MOUSE_PRESSED = false;
	// ...
}

const sketch = (p5: P5) => {
	// ...
	p5.mousePressed = () => {
		sketch.MOUSE_PRESSED = true;
	};

	p5.mouseReleased = () => {
		sketch.MOUSE_PRESSED = false;
	};
	// ...
};
Then we can start writing updatePosition(), remembering to call it in the draw loop:
// hero.ts
class Cell {
	// ...
	constructor(x: number, y: number, sketch: HeroSketch) {
		// ...
		this.xStart = x;
		this.yStart = y;
	}

	// ...
	updatePosition() {
		const OFFSET_DISTANCE = 2.5; // play with this

		// drawing effect
		if (this.sketch.MOUSE_PRESSED) {
			const yOffset = this.y + this.sketch.CELL_W / 2 - this.sketch.p5.mouseY;
			const xOffset = this.x + this.sketch.CELL_W / 2 - this.sketch.p5.mouseX;

			const gradient = xOffset === 0 ? 0 : yOffset / xOffset; // avoid divide by zero issues

			const dx = Math.sqrt(Math.pow(OFFSET_DISTANCE, 2) / (1 + Math.pow(gradient, 2)));
			const signedDx = xOffset < 0 ? -dx : dx;
			const signedDy = gradient * signedDx;

			this.x += signedDx;
			this.y += signedDy;
		} else {
			const yOffset = this.y - this.yStart;
			const xOffset = this.x - this.xStart;

			if (xOffset === 0 && yOffset === 0) return; // at home

			const distance = Math.sqrt(Math.pow(Math.abs(xOffset), 2) + Math.pow(Math.abs(yOffset), 2));

			const gradient = xOffset === 0 ? 0 : yOffset / xOffset; // avoid divide by zero issues

			/*
                        Return a 7th of the distance per frame - because this code runs every frame,
                        shapes will 'ease' back in to place (as distance decreases each frame). Must have distance lower bound otherwise
                        shape never truly returns 'home'
                        */
			const RETURN_DISTANCE = distance < 0.5 ? distance : distance / 7; // play with this

			const dx = Math.sqrt(Math.pow(RETURN_DISTANCE, 2) / (1 + Math.pow(gradient, 2)));
			const signedDx = xOffset < 0 ? -dx : dx;
			const signedDy = gradient * signedDx;

			this.x -= signedDx;
			this.y -= signedDy;
		}
	}
}

// ...

const sketch = (p5: P5) => {
	// ...
	p5.draw = () => {
		// ...
		for (let i = 0; i < sketch.cells.length; i++) {
			for (let j = 0; j < sketch.cells[i].length; j++) {
				sketch.cells[i][j].updatePosition();
				// ...
			}
		}
	};
};
You can see that the code for whether the mouse is currently being pressed or released is pretty similar. In the first case, we find the horizontal and vertical offsets of the mouse position with respect to the centre of the current cell, use the ratio of those two values (or gradient) to calculate x and y components of a translation with a fixed distance OFFSET_DISTANCE and finally make sure everything's going in the right direction. When the mouse is released, we find the offset from the cell's initial 'home' position xStart and yStart (added to the constructor) and similarly calculate x and y components of our translation, with our fixed distance (RETURN_DISTANCE) this time being proportional to our overall distance from 'home'. We have to make sure RETURN_DISTANCE is overriden when distance gets very small, otherwise we end up travelling a seventh of tinier and tinier numbers, never quite getting to our destination. I set that at 0.5, as small as possible to avoid the snapping effect being visible.
We're not done yet. The cells are indeed travelling away from the mouse when we click, but we need to localise the effect to prevent all cells in the scene from taking part in the action. We could figure out a fancy function on Desmos like we did earlier, or we could just add a variable threshold which we compare distance to in the code where the mouse is being pressed:
// hero.ts

class Cell {
	// ...
	updatePosition() {
		const threshold = this.sketch.CELL_W * 1.5;

		// ...
		if (this.sketch.MOUSE_PRESSED) {
			const yOffset = this.y + this.sketch.CELL_W / 2 - this.sketch.p5.mouseY;
			const xOffset = this.x + this.sketch.CELL_W / 2 - this.sketch.p5.mouseX;

			const distance = Math.sqrt(Math.pow(Math.abs(xOffset), 2) + Math.pow(Math.abs(yOffset), 2));
			if (distance > threshold) return;
			// ...
		} else {
			// ...
		}
	}
}
At this point, I noticed that the two effects weren't behaving very nicely together. It wasn't a bug, but as a result of cells further from the mouse shrinking, it wasn't always very easy to see your doodles. So I added the following code to updateSize() to set each cell to have a constant size when we're in 'draw mode':
// hero.ts
class Cell {
	// ...
	updateSize() {
		// draw mode, we want cells to be roughly constant diameter so drawings can be seen clearly
		if (this.sketch.MOUSE_PRESSED) {
			const finalSize = (this.sketch.CELL_W - 2) * 0.7;
			const step = 0.3;

			this.d = this.d >= finalSize ? finalSize : this.d + step;
			return;
		}
		// ...
	}
}
The final product is as follows:
Conclusion
I had a lot of fun making this hero section - I got to play with p5, revisit some maths locked deep inside a corner of my brain and challenge my perception of what a website should look and feel like. When we make UIs all day it's easy to get trapped in a literal box, churning out boring and overdone layouts. P5, among other libraries like three.js, expands our view of what's possible on the web, and most importantly allows us to create things that are fun to use. There's so much that could be added to this, but I've left it at what I think is a reasonable point.